...
| Excerpt |
|---|
If you are writing a script that interacts with Jira /Confluence through a REST API, you should authenticate using an OAuth token, rather than an embedded username/password. Here we describe one way to do the 'oauth dance' to generate a trusted token using Python 3 - specifically the |
There are many attempts to explain this process on the internet. Every one I have found has been awful: either handwaving away details, or too dense, trying to explain the mechanics of OAuth with missionary zeal. Just tell me what to type and where to click, and give me my token!
| Table of Contents |
|---|
On with the instructions.
...
Last updated |
| Warning | ||
|---|---|---|
| ||
Personal Access Tokens make this approach obsolete. Use them instead if you are using Jira 8.14 and above. |
| Table of Contents |
|---|
Establishing OAuth trust
Install Python 3
Running python3 or python --version should show Python 3.x.
Create a venv
| Code Block |
|---|
mkdir jira-oauth cd jira-oauth python3 -m venv venv . venv/bin/activate |
Install Python libraries
| Code Block |
|---|
pip3 install 'jira[cli]==3.5.0' ipython==8.10 pyjwt |
Yes, you need those particular versions. The jira library >3.5.0 broke backwards-compat with older Jiras, and ipython > 8.10 is broken for our purposes.
| Expand | ||
|---|---|---|
| ||
If you get an error:
then pip3 install -U pip should fix it. |
Generate an RSA public key
| Code Block |
|---|
openssl genrsa -out rsa.pem 2048
openssl rsa -in rsa.pem -pubout -out rsa.pub
|
Create an application link
In Jira (or Confluence), create an applink. Applinks normally connect to other HTTP apps, but in this case our OAuth client doesn't have a URL, so use a fake one.
I originally created these instructions when creating an OAuth token for a Nagios Jira license monitor, hence the token I use is monitor-jira-license , and the fake URL is http://monitor-jira-license:

Jira will complain, but just click Continue:
...
Click 'Continue', and your application link will be created.
![]()
OAuth dance
Now from your terminal, do the OAuth dance with your Jira installation:
| Code Block |
|---|
BROWSER='echo %s' jirashell --server https://issues.redradishtech.com --consumer-key monitor-jira-license --key-cert rsa.pem --oauth-dance |
...
This should print a URL:
| No Format |
|---|
https://issues.redradishtech.com/plugins/servlet/oauth/authorize?oauth_token=W5dwQnW9PoIPZfW35dINpl1V86Hq8wPY
Your |
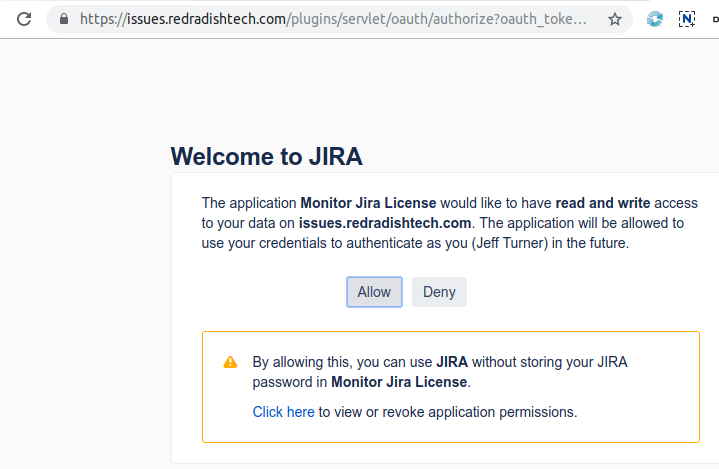
Click *Allow* in the Browser window:

...
| Code Block |
|---|
Your browser is opening the OAuth authorization for this client session.
Have you authorized this program to connect on your behalf to https://issues.redradishtech.com? (y/n) |
| Warning |
| Expand | ||
|---|---|---|
| ||
If, instead of printing a URL, the jirashell command just prints:
That means your |
| Expand | ||
|---|---|---|
| ||
Jirashell would normally try to launch your preferred web browser, using the webbrowser library. By setting the BROWSER env variable, we tell Python not to bother, and just print the URL for us to manually cut & paste. This is required for server environments, where |
At this point you need to decide which JIRA user you want to grant OAuth access as. For most scripts you should create a dedicated JIRA role account with reduced privileges. Log out and back in to JIRA as that user, (or use switchuser.jsp) then open the link:
Click 'Allow' in the Browser window:
After the URL, your terminal also should have displayed:
| Code Block |
|---|
Your browser is opening the OAuth authorization for this client session.
Have you authorized this program to connect on your behalf to https://issues.redradishtech.com? (y/n
)[1127:1155:0610/114150.937882:ERROR:browser_process_sub_
thread.cc(221)] Waited 7 ms for network service
Opening in existing browser session.Ignore the extra debugging: you're still being prompted for 'y' or 'n' at this point. |
Press 'y'.
The jirashell command now proceeds to launch an IPython session:
| Code Block |
|---|
<JIRA Shell 2.0.0 (https://issues.redradishtech.com)> *** JIRA shell active; client is in 'jira'. Press Ctrl-D to exit. In [1]: |
...
Type oauth to print the OAuth object:
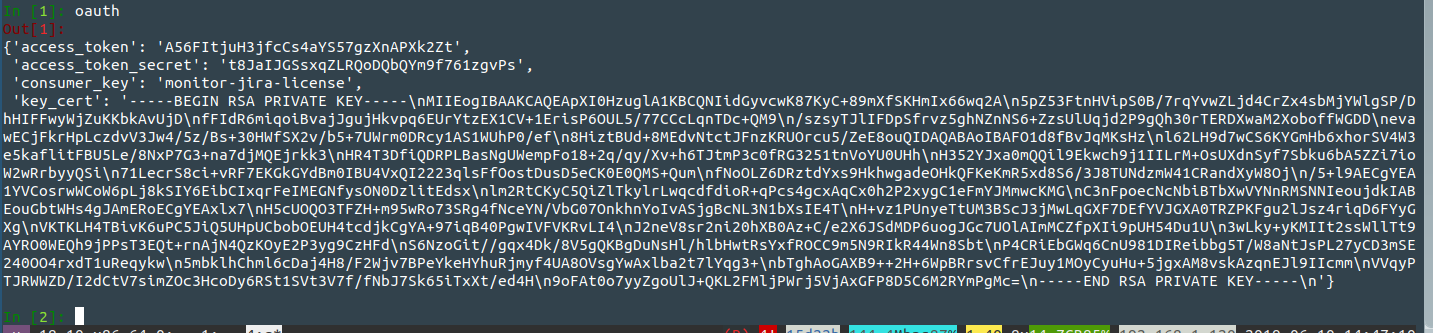
Now press

Press ctrl-d to exit.
...
Test your OAuth token
Jira trusts us. Now we need to print the token. Add '--print-tokens' to the last command:
| Code Block |
|---|
jirashell --server https://issues.redradishtech.com --consumer-key monitor-jira-license --key-cert rsa.pem --oauth-dance --print-tokens |
Output looks like:
| Code Block |
|---|
Request tokens received.
Request token: kLYKeT0g9EiJDDmqlxQTH9VjRs2fpFS6
Request token secret: snhWUlGQmzLu6I9ju1aQGNjulQQPT1lz
Please visit this URL to authorize the OAuth request:
https://issues.redradishtech.com/plugins/servlet/oauth/authorize?oauth_token=kLYKeT0g9EiJDDmqlxQTH9VjRs2fpFS6
Have you authorized this program to connect on your behalf to https://issues.redradishtech.com? (y/n) |
Hit 'n'.
Test your OAuth token
Now embed the 'Request token' and 'Request token Now embed the 'consumer_key', 'access_token' and 'access_token_secret' values you saw above into a new jirashell command:
| Code Block |
|---|
jirashell --server https://issues.redradishtech.com --consumer-key monitor-jira-license --access-token kLYKeT0g9EiJDDmqlxQTH9VjRs2fpFS6A56FItjuH3jfcCs4aYS57gzXnAPXk2Zt --access-token-secret snhWUlGQmzLu6I9ju1aQGNjulQQPT1lzt8JaIJGSsxqZLRQoDQbQYm9f761zgvPs --key-cert rsa.pem <<< 'jira.server_info()' |
...
| Code Block |
|---|
<JIRA Shell 2.0.0 (https://issues.redradishtech.com)>

*** JIRA shell active; client is in 'jira'. Press Ctrl-D to exit.

In [1]: Out[1]:
{'baseUrl': 'https://issues.redradishtech.com',
 'version': '7.13.0',
 'versionNumbers': [7, 13, 0],
 'deploymentType': 'Server',
 'buildNumber': 713000,
 'buildDate': '2018-11-28T00:00:00.000+1100',
 'scmInfo': 'fbf406879436de2f3fb1cfa09c7fa556fb79615a',
 'serverTitle': 'Red Radish JIRA'}

In [2]: Do you really want to exit ([y]/n)? |
You now have the three things you need for your script: the token, the token secret, and rsa.pub private key.
Using jirashell as a base for your script
If your script is Python, you can use jirashell as a library to handle all the ugly command-line parsing. In my case:
| Code Block |
|---|
$ cp venv/bin/jirashell check-jira-license
$ vim check-jira-license   # Make changes
$ cat check-jira-license
#!/home/jturner/src/redradish/nagios-jira-license/venv/bin/python3
# -*- coding: utf-8 -*-
import re
import sys
from jira.jirashell import get_config, JIRA
if __name__ == '__main__':
    options, basic_auth, oauth, kerberos_auth = get_config()
    jira = JIRA(
            options=options,
            oauth=oauth
            )
print(jira.server_info()) |
This command can then be invoked using the same command-line flags as jirashell :
| Code Block |
|---|
./check-jira-license --server https://issues.redradishtech.com --consumer-key monitor-jira-license --access-token kLYKeT0g9EiJDDmqlxQTH9VjRs2fpFS6 --access-token-secret snhWUlGQmzLu6I9ju1aQGNjulQQPT1lz --key-cert rsa.pem |
Some JIRA REST calls are not wrapped in the Python JIRA library. For those, you can use the OAuth credentials with the requests library directly, as follows:
| Code Block |
|---|
#!/home/jturner/src/redradish/nagios-jira-license/venv/bin/python3

# -*- coding: utf-8 -*-
import re
import sys

from jira.jirashell import get_config, JIRA
import requests

def getlicensecounts(options, jira):
    url=options['server'] + '/rest/plugins/applications/1.0/installed/jira-software'
    response = requests.get(url,  auth=jira._session.auth)
    responsejson = response.json()
    return (responsejson['accessDetails']['activeUserCount'], responsejson['accessDetails']['licensedUserCount'])

def main():
    options, basic_auth, oauth = get_config()

    jira = JIRA(options=options, oauth=oauth)
    activecount, totalcount = getlicensecounts(options, jira)
    print(f"Using {activecount} of {totalcount} license slots")

if __name__ == '__main__':
sys.exit(main()) |
You can invoke non-REST ( /secure/admin/* ) URLs with OAuth credentials too, but Jira's "websudo" authentication will demand a password, rendering OAuth useless.